Guide · Plant spacing
Space plants for the size they’ll be, not the pot they came in
The number that matters is the mature width on the tag. How far apart to plant, how far from the house, where trees and power lines meet, and what to do with the gap while it grows in.

YardRemake Studio
Published October 29, 2026 · 9 min read · 7 sections

On this page
Every plant at the garden center is sold at its most misleading size. The holly in the 3-gallon pot is knee-high and sits neatly under the window. A few years later it’s covering the window, and you’re out there every spring with shears, trying to hold it to a size it was never going to stay.
Spacing is the planting decision that’s hardest to undo, and the number that gets it right is already printed on the tag: the mature size. Here’s how to use it.
Read the tag for the plant you’ll have in five years
Most tags give mature height × width. Width is the one that decides spacing, and it’s a diameter — a shrub listed at 6 feet wide reaches roughly 3 feet out from its center in every direction.
Two habits worth building:
- Check the number somewhere else. Labels can be wrong. A University of Georgia extension horticulturist once found a holly tag that printed the mature size in inches instead of feet; planted by the label, the shrubs would have gone in about a foot apart. An extension fact sheet or our plant pages, which list mature size for every plant, make a quick second opinion.
- Plan for the top of the range. That’s our rule, not a formula. If a tag says 4 to 6 feet and the plant will be happy where you put it, space for 6. Guessing big costs you some mulch for a few years. Guessing small costs you a shrub.

Burford Holly

Common Lilac

Southern Wax Myrtle

Leyland Cypress

Colorado Blue Spruce

Eastern White Pine

Southern Magnolia

River Birch
Space by mature width, center to center
Spacing is measured on center — from the middle of one plant to the middle of the next. Extension guidance lands in a fairly narrow band:
- At the full mature width for plants you want to read as individuals. The University of Georgia’s example: a dwarf yaupon holly that grows about 8 feet wide goes 8 feet apart.
- A little inside it for a massed bed. University of Missouri Extension spaces shrubs so they begin to merge at about 70 percent of their mature size. University of Maryland’s planting templates set shrubs that mature 2 to 4 feet wide about 3 feet apart, and 6-to-10-foot shrubs about 5 feet apart.
- Mature width minus 2 feet for a hedge, per UGA, so a sheared row knits into one wall.
Groundcovers follow the same logic at a smaller scale. University of New Hampshire Extension puts most of them 6 inches to 2 feet apart: closer fills in faster but costs more. Clemson’s extension suggests planning for full coverage by the end of the third growing season, and notes that staggered rows cover quickest.
Keep shrubs off the house
The foundation is where crowding does the most damage, because the wall is an edge the shrub can’t grow through.
The rule extension services keep repeating is half the mature width plus at least a foot from the foundation (UGA, NC State). A shrub that matures 6 feet wide goes about 4 feet out. That leaves about a foot between the grown shrub and the wall, the low end of the 12- to 18-inch air gap Clemson recommends — room for air to move past foundation vents, less mildew, and no shrub growing lopsided against the siding.
Two more clearances:
- Keep wood mulch and groundcovers about a foot back from the foundation so they don’t give termites a bridge to the house (Clemson, LSU AgCenter).
- Under windows, choose by mature height, not today’s height. UGA lists a 1-gallon Burford holly that grows up to cover the windows among its top five planting mistakes.
What overplanting actually costs
Planting tight looks good for a season. UGA’s Gary Wade describes what follows: the plants compete for light, water and nutrients, interior foliage dies off, restricted air circulation leaves them stressed and more prone to insects and disease, and the whole bed ends up sheared into one shapeless green mass. Groundcover junipers set too close build up layers of foliage whose dense interior becomes a haven for spider mites and twig blight.
NC State’s Extension Gardener Handbook adds the bill. Planting twice as many plants as you need, planning to thin them in a few years, doubles the cost of the job — and the thinning often never happens. Crowd the house itself and the planting can trap moisture against it, which the handbook links to mildew and mold.
Trees need a much bigger setback
A tree is the extreme case. Oregon State’s extension service points out that a new tree may be 5 to 10 feet tall at planting and grow to 50 or 100. Mississippi State sorts trees by mature height:
- Small trees, under 25 feet (redbud, flowering dogwood): 8 to 10 feet from the house.
- Medium trees, 25 to 40 feet: 15 feet.
- Large trees, over 40 feet (maples, oaks, pines): 20 feet or more.
Other extension services run more cautious. Clemson says a tree less than 15 feet from a building is, in most cases, not a good idea. Oregon State puts shade trees at least 25 feet out. Missouri’s front-yard guide warns that large shade trees seldom belong in a front yard at all, because they dwarf most houses.
Then look up. The International Society of Arboriculture sorts planting spots by distance from overhead distribution lines: within 15 feet on either side, choose a tree that matures at 20 feet or less; 15 to 50 feet away, 40 feet or less; beyond 50 feet, any size. Your utility may set stricter rules, so ask before you buy.
And look down. Roots commonly spread many times the breadth of the crown, per the ISA, so call 811 before you dig a planting hole. NC State notes the service is free; the ISA notes locating lines first is often required by law.
Living with the gap
The honest downside of correct spacing is that the bed looks thin at first. Wade says as much, and calls it acceptable.
How long it lasts depends on the plant. There’s an old gardener’s saying, which Clemson’s extension repeats about clematis: the first year they sleep, the second year they creep, the third year they leap. Maryland’s extension gives perennials around three years to become well established and look full.
Ways to fill the gap without undoing your spacing:
- Annuals in the open ground. NC State suggests filling gaps temporarily with annuals for a few years, as long as they don’t crowd the permanent plants. Missouri’s guide goes further: filling space while new shrubs grow may be the best use of flowers in a front yard.
- Mulch the rest. Two to 3 inches holds weeds down and moisture in until the plants close (UNH; Maryland caps it at 3 inches).
- Perennials you plan to move. Our approach: tuck cheap, easily divided perennials into the ground a shrub will claim in year four, then lift and replant them elsewhere as it closes in.
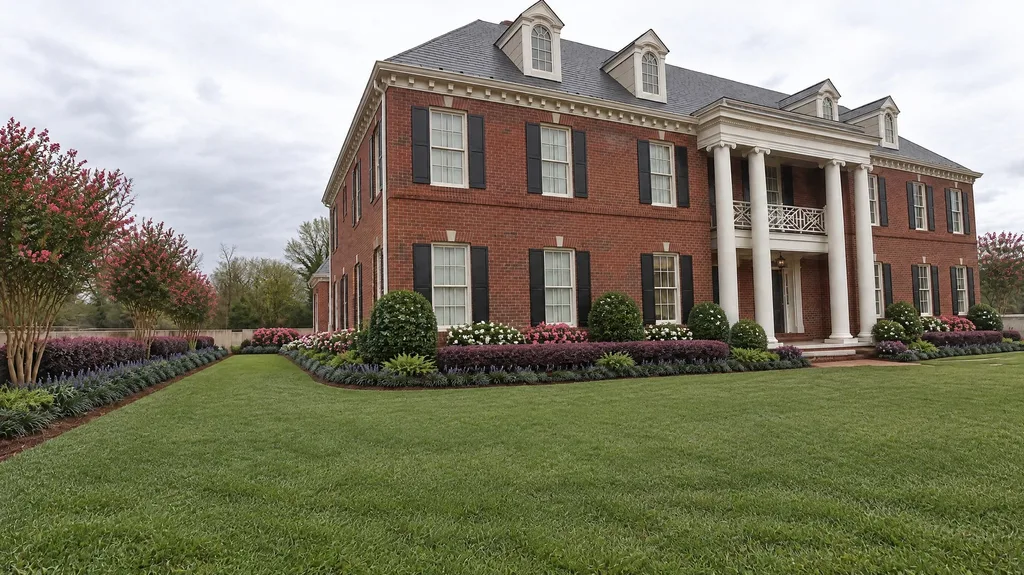
That’s the full design, with every plant listed.
Before anything goes in the ground
Set the pots out on the bed at their final spacing, measured from the mature width, and stand back. There will be a lot of empty ground. That’s correct.
If you design in YardRemake, the Design Pack keeps those numbers together: its plant schedule lists every plant’s mature size alongside the quantity, so you can check one against the other before you buy. Try the look in the studio first — a new render is cheaper than moving a shrub in year three.
Sources
- University of Georgia CAES Field Report — “Proper landscape plant spacing saves time, money”
- University of Georgia CAES Field Report — “Top Five Planting Mistakes in Landscapes”
- NC State Extension — Extension Gardener Handbook, Ch. 19 “Landscape Design”
- Clemson Cooperative Extension HGIC 1050 — “Site Considerations When Selecting Plants”
- Clemson Cooperative Extension HGIC 1702 — “Foundation Plantings”
- Clemson Cooperative Extension HGIC 1100 — “Groundcovers: Planting and Care”
- Clemson Cooperative Extension HGIC 1104 — “Clematis”
- University of Missouri Extension G6905 — “Landscaping Your Front Yard”
- University of Maryland Extension — “Landscape Designs with Native Plants”
- University of Maryland Extension — “Perennials: Selection, Planting, and Care”
- University of New Hampshire Extension — “Groundcovers for New Hampshire”
- LSU AgCenter — “Designing and planting foundation beds”
- Mississippi State University Extension P4026 — “Yard Tree Placement and Risk Assessment”
- Oregon State University Extension EC 1438 — “Selecting, planting and caring for a new tree”
- International Society of Arboriculture / TreesAreGood — “Avoiding Tree & Utility Conflicts”
- Missouri Botanical Garden Plant Finder — Ilex cornuta
- Missouri Botanical Garden Plant Finder — Syringa vulgaris
- Missouri Botanical Garden Plant Finder — Morella cerifera
- Missouri Botanical Garden Plant Finder — × Cuprocyparis leylandii
- Missouri Botanical Garden Plant Finder — Picea pungens
- Missouri Botanical Garden Plant Finder — Pinus strobus
- Missouri Botanical Garden Plant Finder — Magnolia grandiflora
- Missouri Botanical Garden Plant Finder — Betula nigra
